
They love to play, and the best part is that you don’t have to buy them expensive toys to keep them busy. Because you can make homemade cat toys from household items with a little imagination, you can turn ordinary things into fun cat toys. These do-it-yourself projects range from sensory treats and interactive puzzles to cozy hideaways and dangling chasers. They are great for keeping you busy and stimulating your mind for hours without spending a lot of money.
These do-it-yourself cat toys are not only simple to make, but they are also eco-friendly because they use old things like bubble wrap, socks, cardboard boxes, and even t-shirts. There is a homemade toy for every cat’s favorite way to play, whether it’s batting at light wool balls, chasing flying objects, or pouncing on toys that give out treats. This guide will show you how to make a range of easy-to-make cat toys that will make your pet happy and use things you already have at home.
[This post may contain affiliate links. What does that mean to you? Well, if you click on a product and make a purchase, I may get some compensation from you at no charge. If you want to read the boring stuff my full disclosure can be found here.]
1. Sock Fish for Feline Fun

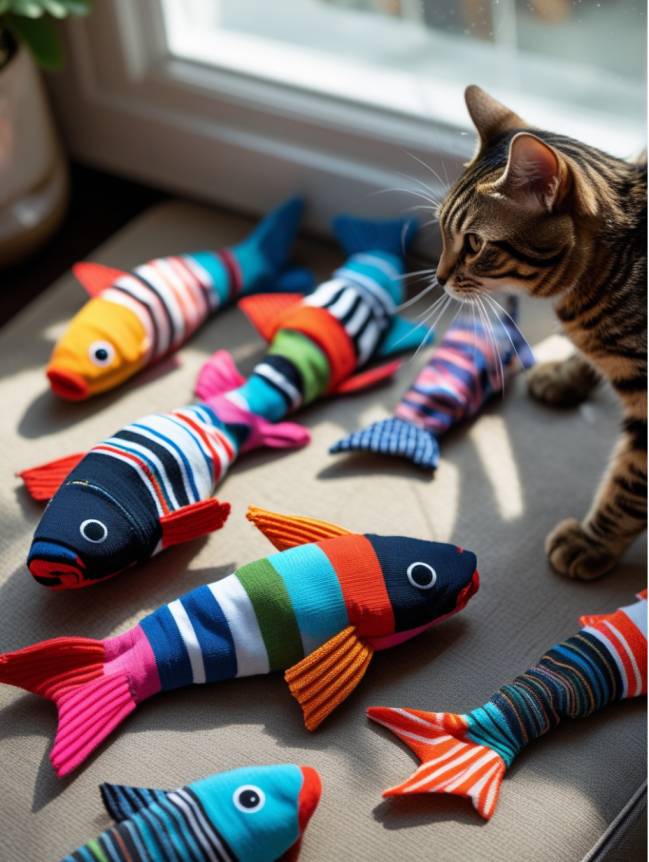
Make your kitty companion these cute sock fish toys out of your old, mismatched socks! These vibrant, energetic fish are filled with soft filling or catnip, which makes them an enticing toy for cats to snuggle, bat, and jump on. In addition to being inexpensive, this easy do-it-yourself project is a fantastic way to turn old socks into something fun for your cat.
Materials Needed:
- Old socks (various colors and patterns)
- Catnip (optional, for added feline excitement)
- Cotton or soft stuffing (to give the fish shape)
- String or twine (for tying and hanging)
- Scissors
- Fabric glue or needle and thread (for securing details)
- Felt or fabric scraps (for eyes and decorative details)
- Marker or fabric paint (for drawing faces)
Instructions:
- Stuff the Socks: Stuff each sock with catnip or cotton filling. To achieve the required firmness, change the amount.
- Shape the Fish: To create a plump body, push the stuffing toward the sock’s toe end. Give yourself enough room to tie at the open end.
- Tie It Up: Simply knot the sock at the open end or use a string to make the fish’s “tail.”
- Add Features: Cut out little circles of felt for eyes, then sew or glue them in place. Make adorable faces using markers or fabric paint.
- Make It Fun: You may tie the fish to a string and hang them for interactive playtime with your cat, or you can leave them loose for batting.
- Introduce to Your Cat: Watch your cat jump and pursue their new toy when you put the sock fish in their play area!
Final Touch:
You may either scatter the sock fish for your cat to find or hang them from a stable object. Your cat will be amused for hours by the catnip scent and velvety texture!
2. Empty Toilet Paper Roll Mice
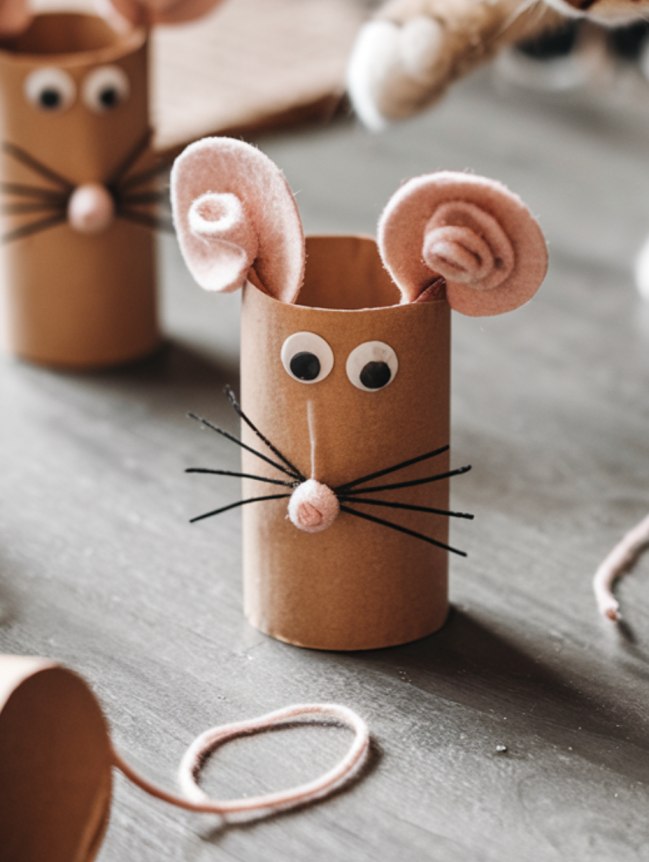

Make cute cat mice out of old toilet paper rolls. Making these bright and fun paper mice is easy and good for the environment. They are also great toys for your cat. With their wiggling tails, cute ears, and happy faces, these little mice will keep your cat busy for hours as they bat, chase, and jump on them.
Materials Needed:
- Empty toilet paper rolls (one per mouse)
- Colored paper or construction paper
- Scissors
- Glue or tape
- Googly eyes (optional)
- Markers or pens (for drawing features)
- Pipe cleaners or yarn (for tails and whiskers)
- Catnip (optional, for added feline fun)
Instructions:
- Wrap the Roll: Put colored paper over the toilet paper roll to make your mouse look more interesting.
- Create the Face: For the mouse’s head, cut a small oval or round piece of brown paper. Put the ears on top and glue them down.
- Add Features: You can draw eyes on or stick on plastic eyes. Make little beards out of yarn or thin paper strips and stick them on the face.
- Attach the Tail: To make a fun, twisted tail, put a pipe cleaner or yarn in the back of the roll.
- Fold the Ends: Fold the bottom of the roll in a little to make it look like a real mouse.
- Make It Irresistible: To get your cat to play with the toy, sprinkle catnip inside or around it.
- Playtime! Your cat should be able to bat, chase, and jump on their new fuzzy mouse toy.
Final Touch:
Put the mice in different areas of your cat’s play area and watch as it becomes very interested in them. You can also hang the mouse from the tail of the mouse on a line to get your cat to play with you.
3. DIY Paper Mouse Hideout


This DIY Paper Mouse Hideout will be fun and cozy for your cat. This cute hideout is made from common household items and is shaped like a friendly mouse. It has ears, whiskers, and a round opening for your cat to peek through. Besides being creative, it’s also very useful because it has a place for your cat to curl up and a place for kids to play.
Materials Needed:
- A large balloon (for shaping)
- White craft paper or thick cardboard
- Colored paper (for ears, nose, and eyes)
- Scissors
- Glue or tape
- Black marker (for drawing whiskers and expressions)
- Utility knife (to cut the entrance hole)
- Catnip or a soft cushion (for extra comfort inside)
Instructions:
- Create the Base: Fill a balloon up to the size you want for your cat’s hiding place.
- Build the Structure: Glue or tape strips of craft paper around the balloon, leaving a hole for the balloon’s mouth.
- Let It Dry: When it’s dry, carefully pop the bubble and take it off, leaving behind a strong paper shell.
- Add Features: Using colored paper, cut out ears, a nose, and eyes and then glue them on. Use a black marker to add whiskers and other features to the face.
- Cut the Entrance: Cut a hole in the wall with a pocket knife so that your cat can get in.
- Make It Cozy: To get your cat to go inside, put catnip, a soft cloth, or a small cushion inside.
- Playtime! Watch as your cat plays, hides, and explores their new paper mouse den.
Final Touch:
Put the hideout where your cat likes to play, and you can enjoy seeing them peek in and out of their cute new DIY mouse house.
4. DIY Sock Cat Plush Toy

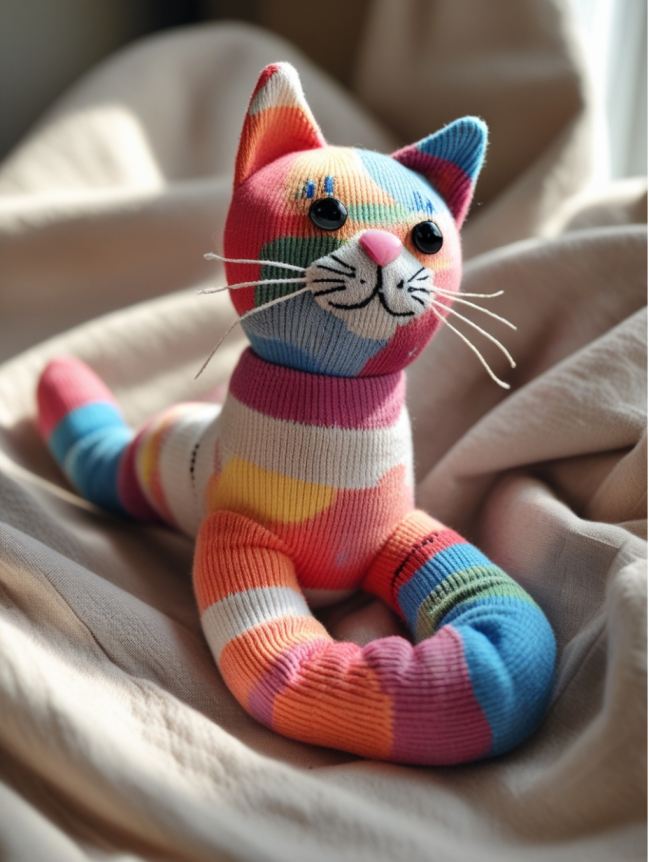
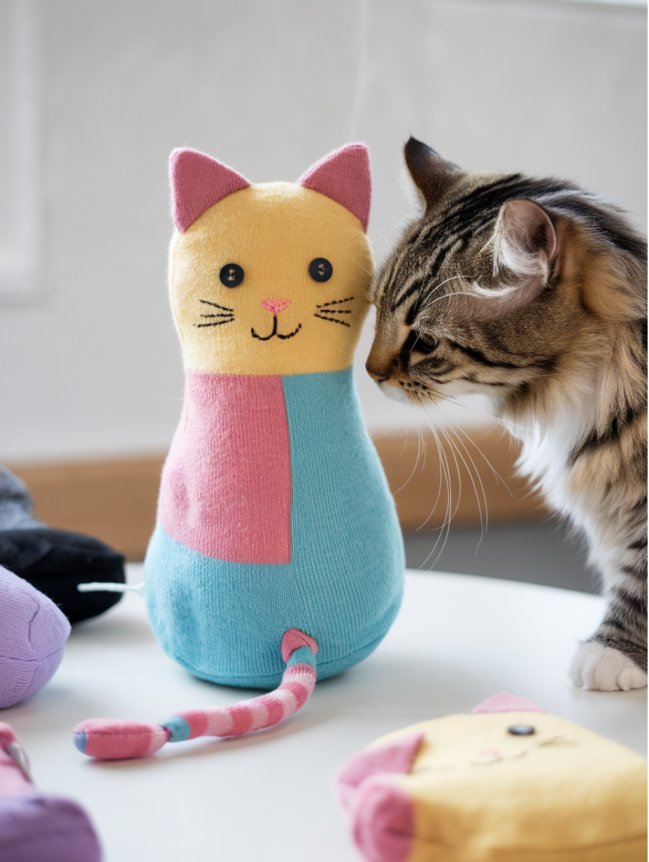
You can make a cute DIY Sock Cat Plush Toy out of old, bright socks. This fun and eco-friendly craft project is a soft and cuddly cat that you can use to make a unique toy for your cat or just as a cute decoration. Sock cats are cute because their colors and patterns aren’t always matched. This makes each one unique.
Materials Needed:
- Mismatched socks (various colors and patterns)
- Cotton stuffing or fabric scraps (for filling)
- Needle and thread (or fabric glue for a no-sew option)
- Googly eyes or buttons (for eyes)
- Embroidery thread or yarn (for whiskers and facial details)
- Scissors
- Fabric markers (for extra facial details)
- Pipe cleaners (optional, for a flexible tail)
Instructions:
- Create the Head: Create the cat’s head by stuffing one sock. To hold the shape in place, sew or tie off the base.
- Form the Body: Fill another sock with stuffing and tie off the open end to make the cat’s body.
- Attach the Head and Body: Affix the head to the body firmly with glue or sewing.
- Make the Legs and Tail: To make the legs and tail, cut and shape smaller pieces of sock. Then, connect them to the body.
- Add Facial Features: Stick plastic eyes or buttons on with glue or stitch. Next, sew or draw a mouth and nose. If you want whiskers, use sewing thread.
- Final Touches: Make sure the shape is balanced by adjusting the stuffing and making sure all the ties are tight.
- Playtime! Get your real cat to meet the sock cat, or put it in their play area so they can play and snuggle with it.
Final Touch:
Show off your do-it-yourself sock cat on a shelf, play with it as a cat toy, or give it to someone else who loves cats. Each sock cat is different, which shows imagination and is a fun way to upcycle old socks into cute things.
5. DIY Feathered Wand Teaser for Cats

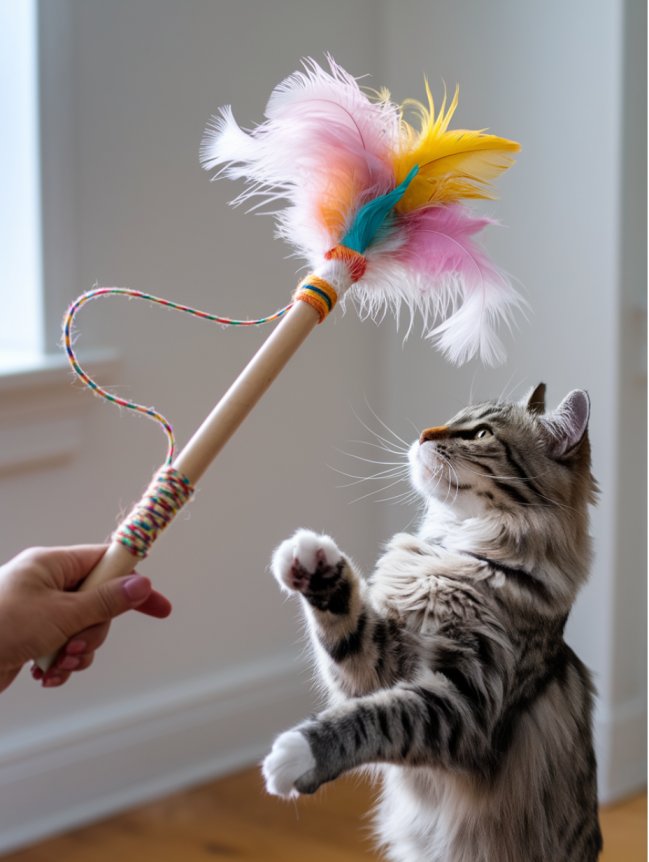
This Feathered Wand Teaser was made by hand to bring out your cat’s natural hunting skills. This fun and interesting toy moves like real prey, which makes it great for playtime with other kids. With soft feathers, bright wool wraps, and a light wand, your cat will be entertained while getting some exercise. Plus, it’s a simple, low-cost project that you can do yourself with things you probably already have.
Materials Needed:
- A wooden dowel or sturdy stick (about 12-18 inches long)
- Feathers (real or synthetic, in vibrant colors)
- Twine, yarn, or fabric strips (for decorative wrapping)
- Small beads or bells (optional, for extra sound effects)
- Hot glue gun or strong adhesive
- String or fishing line (for attaching the feathers)
- Scissors
Instructions:
- Prepare the Wand: Sand down a wooden rod to get rid of any rough spots.
- Decorate the Handle: Wrap yarn or string around the base of the wand and glue it down to make it more stable and stylish.
- Attach the String: Attach a strong thread or fishing line to the top of the stick.
- Add the Feathers: Put some bright feathers in a bundle and tie them firmly to the end of the string. If you need to, use glue to keep them in place.
- Enhance the Teaser: To make it more fun, put small bells or beads near the feathers so they make noise and move.
- Let It Dry: Before using, make sure that all the parts that were attached are completely dry.
- Time for Play! To get your cat to chase and jump, wave the feather stick around or drag it across the floor.
Final Touch:
Keep the feathered stick out of harm’s way when not in use to keep your cat interested in it. Playing with your cat every day will help you both stay fit and mentally stimulated while also improving your bond.
6. DIY Crinkly Crunch Balls for Cats
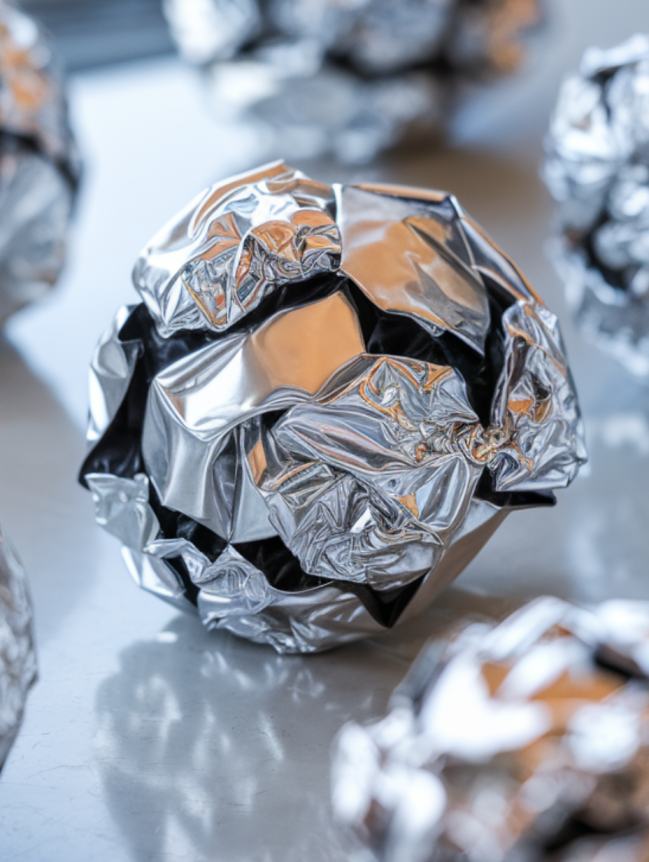
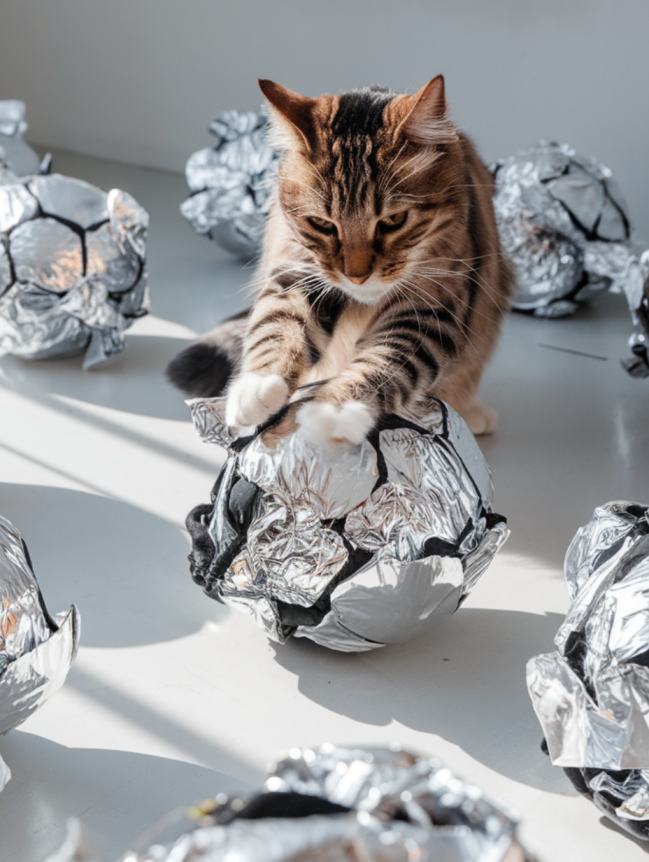
With these Crinkly Crunch Balls, you can give your cat a fun, light, and crinkly toy. These do-it-yourself toys are made from recycled materials like snack bags and foil. They are a lot of fun because they sound and feel like wild animals rustling their food. Because they are shiny and light, your cat will love to bat, chase, and jump on them, which will keep them busy and active.
Materials Needed:
- Empty snack bags or foil wrappers (clean and dry)
- Aluminum foil (for a crinkly core)
- Colorful tissue paper or lightweight gift wrap (optional, for decoration)
- Scissors
- String (optional, for dangling play)
Instructions:
- Create the Core: Make a firm ball out of a small piece of metal foil.
- Wrap with Crinkly Material: Wrap the foil ball in small pieces of snack bags. The layers will make the food crunchier.
- Secure the Shape: To keep the ball’s round shape, gently press and roll it between your hands. You can add more paper or snack bags if you need to.
- Add Decoration: You can wrap the ball in bright tissue paper or leave it alone for a shiny, reflected look.
- Make It Interactive: If you want, you can tie one of the balls to a line and hang it up to play with.
- Time for Fun! Watch your cat chase, bat, and pounce with joy as you roll the crinkly balls across the floor.
Final Touch:
Keep extra crinkly balls in a small jar so you can switch them out for more fun. Change them out every so often to keep your cat interested, and enjoy seeing how happy they are with these simple but fun DIY toys!
7. DIY Cardboard Puzzle Feeder for Cats


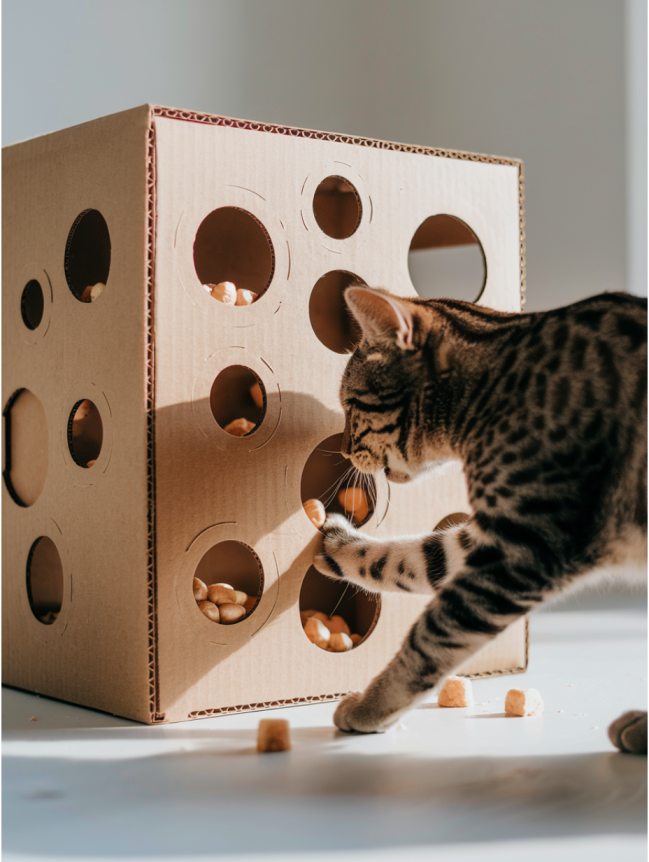
With this easy-to-make cardboard puzzle feeder, you can make meals fun and interesting for your cat. With its carefully placed holes, this feeder stimulates animals’ natural desire to hunt, offering both fun and educational benefits. Cats stay busy while eating by batting and reaching for their food. This slows down their eating, which is good for their digestion and keeps them from getting bored.
Materials Needed:
- A sturdy cardboard box (shoebox or larger)
- Scissors or a utility knife
- Non-toxic glue or tape (for reinforcement)
- Small plastic container or cup (optional, to hold treats inside)
- Cat treats or kibble
Instructions:
- Prepare the Box: Take off any flaps that aren’t needed and make sure the box is clean and strong.
- Cut the Holes: Cut several holes in the top and sides of the box with scissors or a pocket knife. The holes should be just the right size for your cat’s paw to fit through.
- Reinforce the Structure: Tape or glue the ends of the box if you need to make it last longer.
- Add Treats: Put toys or small amounts of dry cat food inside the box. If you want to make it harder, you can add a small jar inside.
- Introduce the Puzzle: Allow your cat to investigate and learn how to get their treats by moving the kibble around.
- Monitor & Adjust: Keep an eye on how interested your cat is and change the hole sizes if needed to give them the best experience.
Final Touch:
Move the puzzle feeder around the house to keep it interesting, and add new treats every so often to keep the cats interested. You can make this easy-to-do project that turns your pet’s snack time into a fun, brain-boosting game.
8. DIY Catnip-Infused Sock Pouch


You should get your cat a tempting Catnip-Infused Sock Pouch. It’s a simple toy that works really well at getting them to play. These pouches are made from old socks and are filled with fragrant catnip. They will keep your cat happy, relaxed, and entertained for hours. This DIY toy is a must-have for cat fans who want to spoil their furry friend. They can bat at it, hug it, or roll around with it.
Materials Needed:
- Clean old socks (soft, cotton socks work best)
- Dried catnip (freshly crushed for stronger aroma)
- Cotton stuffing or fabric scraps (for extra fluffiness)
- Needle and thread (or fabric glue for a no-sew version)
- Scissors
- String or ribbon (optional, for extra fun)
Instructions:
- Fill the Sock: A lot of dried catnip should be put inside the sock. If you want it to feel soft, add some stuffing.
- Secure the Opening: Close the open end of the sock with a tight knot to keep the catnip inside. Sew it shut or use fabric glue for extra safety.
- Customize the Toy: For a fun touch, cut the sock into fun shapes or sew on some easy fabric eyes and whiskers.
- Introduce to Your Cat: Put the sock pouch next to your cat and watch them jump, roll, and sniff with joy!
- Refresh the Aroma: Over time, rub the sock to bring back the smell of the catnip, or give your cat new catnip to keep it interested.
Final Touch:
Keep extra sock bags filled with catnip fresh by putting them in a container that won’t let air in. To keep playtime fun and interesting, switch out the toys every so often.
9. DIY Paper Bag Hideaway for Cats
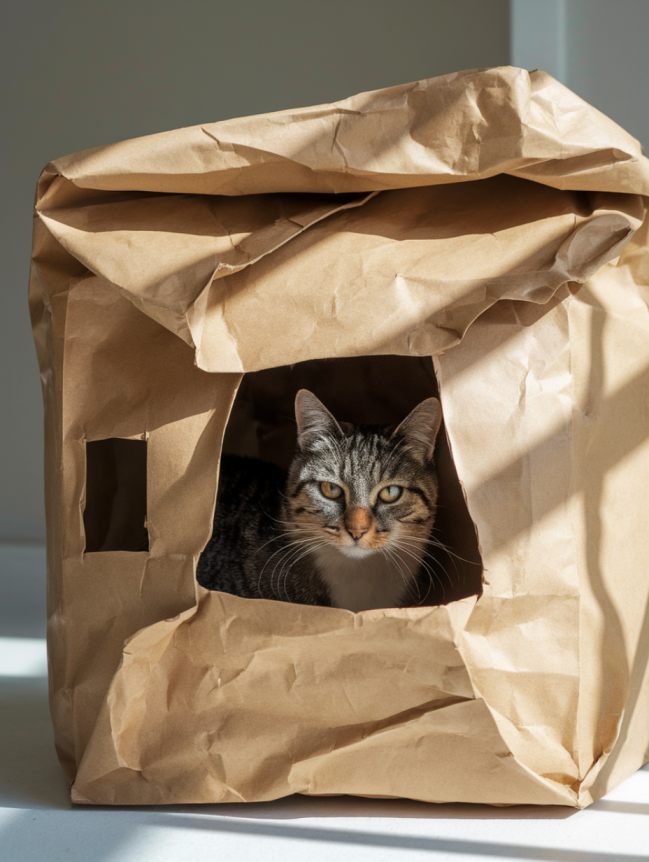

Make your cat a cozy and eco-friendly hideaway out of paper bags. This simple but charming do-it-yourself cat house gives cats a cozy place to stay, a place to play, and a tempting crinkly surface they love. With just a few things from around the house, you can make this hideaway that is great for cuddling up, playing peek-a-boo, or jumping in and out.
Materials Needed:
- A large paper bag or a kraft paper grocery bag
- Scissors or a utility knife (for cutting openings)
- Tape or glue (for reinforcement)
- Crumpled newspaper or soft cloth (for added comfort)
- Twine or ribbon (optional, for decorative touch)
Instructions:
- Prepare the Bag: Make sure the paper bag is strong enough to hold its shape before you open it all the way. If you need to, use tape or glue to make it stronger.
- Create an Entrance: Make a hole in the shape of a circle or an arch that is big enough for your cat to fit through.
- Add Peek-A-Boo Holes: Make smaller holes on the sides so that you can play with them and be curious.
- Make It Comfortable: To make the area feel cozy, put a soft cloth, some crumpled paper, or a cushion inside.
- Personalize the Hideaway: You can design and make it your own with twine, stickers, or markers.
- Introduce It to Your Cat: Place the hiding place in a quiet area and let your cat explore its new home.
Final Touch:
To keep your cat interested, move the hideout around the house every so often. Because it’s light and can be recycled, it’s easy to replace when it gets worn out, so your pet will always have a cozy place to stay.
10. DIY Cozy Cat Sweater from an Old Sock

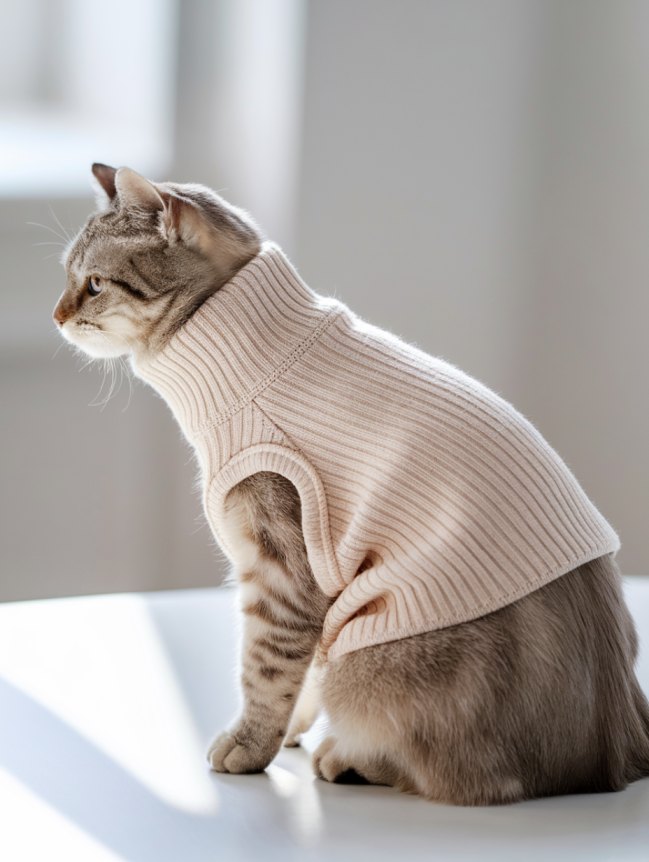
This DIY Cozy Cat Sweater, which is constructed from an old sweater sleeve or repurposed sock, will keep your pet warm and fashionable! Soft, warm, and comfortable for your cat, this simple no-sew project is ideal for chilly days or just adding a little more cuteness. It’s a simple, affordable alternative to expensive tailoring for providing your pet with a cozy garment.
Materials Needed:
- A large, soft sock or sweater sleeve
- Scissors
- Measuring tape (optional)
- Needle and thread (optional, for added reinforcement)
Instructions:
- Choose the Right Sock/Sleeve: You can use the sleeve of an old sweater that is comfortable for your cat’s size or a soft, stretchy sock.
- Cut Openings:
- Cut the sock’s toe portion off. This is where the neck opening will be.
- Cut two tiny holes on either side for the cat’s front legs about halfway down.
- Test Fit: Slide the sweater over your cat’s head gently, then push their paws through the openings. If necessary, change the holes’ size.
- Trim for Comfort: To allow your cat to move freely, shorten the bottom portion if it’s too long.
- Optional Finishing Touches: Stitch any loose ends with a needle and thread for durability, or embellish with a charming bow or design created with a fabric marker.
Final Touch:
To make sure your feline is comfortable, initially allow them to wear the warm sweater for brief periods of time. If they exhibit symptoms of distress, take it off. An enjoyable method to upcycle unwanted clothing and keep them warm is with this do-it-yourself sweater!
11. DIY Ribbon Dancer Delight for Cats
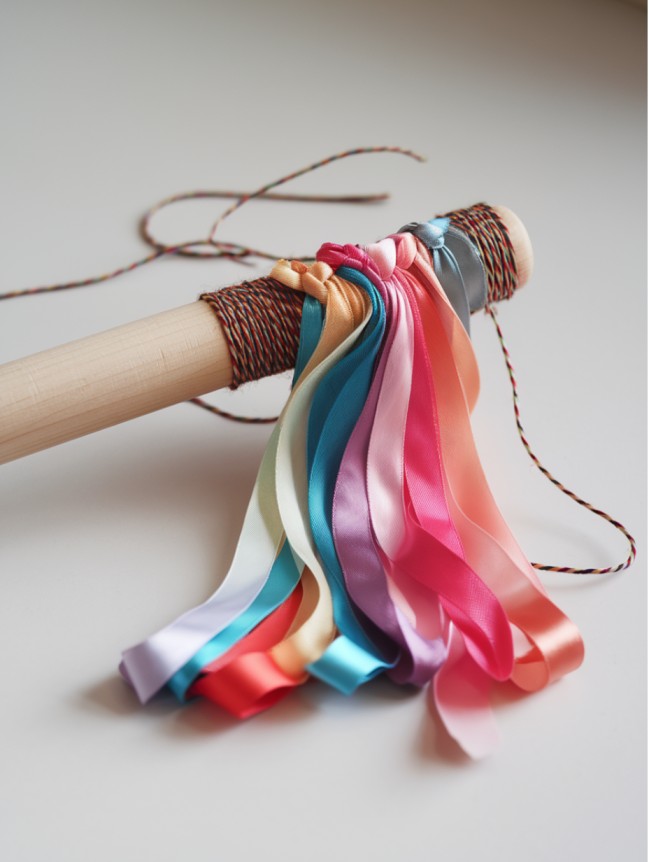

Ribbon Dancer Delight is a beautiful, colorful toy that lets your cat show off its inner acrobat. Playtime will become a graceful and exciting show! This do-it-yourself ribbon wand looks like fluttering prey and will make your cat want to jump, chase, and pounce while enjoying the colorful ribbons spinning around. This interactive toy is great for bonding with others and keeps your mind and body busy.
Materials Needed:
- A wooden dowel or sturdy stick (12-18 inches long)
- Colorful satin ribbons (various lengths and widths)
- Scissors
- Non-toxic glue or tape (for securing the ribbons)
- Small bell (optional, for extra sound engagement)
Instructions:
- Prepare the Stick: Make the stick safe to handle by smoothing out any rough edges.
- Cut the Ribbons: To make a tiered look, cut the ribbons into different lengths (12 to 24 inches).
- Attach the Ribbons: Put the ribbons on one end of the stick and tie or glue them down securely. Wrap it in tape or put a small amount of non-toxic glue on it to make it last longer.
- Enhance with a Bell (Optional): Put a small bell near the bottom of the ribbons to make them more interesting to look at and hear.
- Playtime Begins! Let your cat swat, jump, and chase the ribbon dancer as you slowly wave it through the air.
Final Touch:
Change the speed of the ribbon dancer as you spin and turn it to keep your cat interested. Keep it in a safe place when not in use to keep it exciting and make sure your cat has endless fun playing with it.
12. DIY Sock Puppet Playtime for Cats

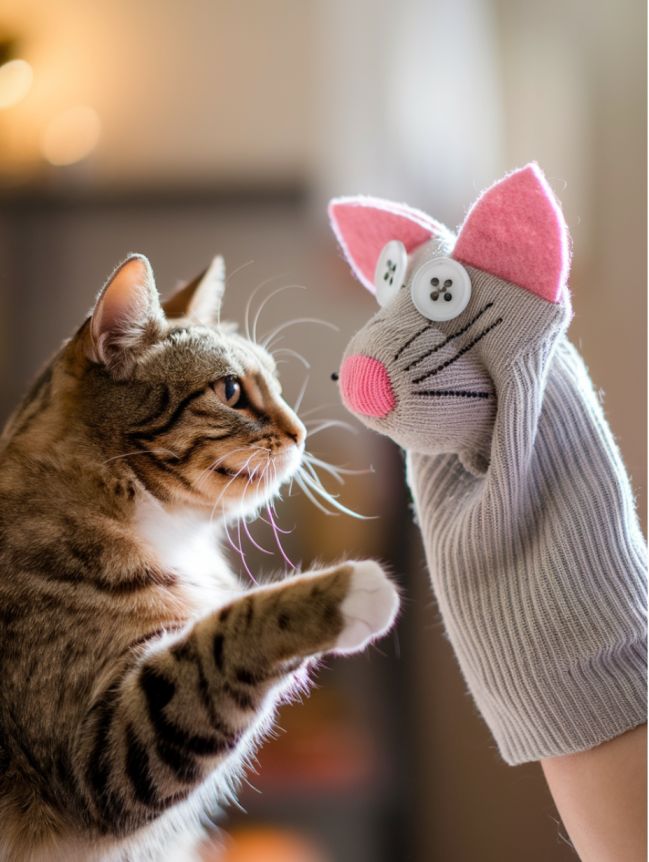
Make an everyday sock into an interactive toy for your cat called a Sock Puppet Playtime! Create a silly sock doll with this fun and easy do-it-yourself project. Your cat will love it and will want to playfully swat, pounce, and explore it. You can’t help but let your furry friend play with the doll because it moves and has bright colors and soft textures.
Materials Needed:
- A clean, colorful sock (preferably long and stretchy)
- Felt or fabric scraps (for eyes, nose, and ears)
- Googly eyes or buttons (for expressive features)
- Needle and thread (or fabric glue for a no-sew option)
- Yarn or embroidery thread (for whiskers)
- Scissors
- Small jingle bell or crinkly paper (optional, for sound effects)
Instructions:
- Prepare the Sock: For fun, make sure the sock is clean and soft. If necessary, turn it inside out.
- Create the Face: Give your doll a lively face by sewing or gluing on felt eyes, a fabric nose, and small ears. For the whiskers, use yarn or thread.
- Add Interactive Elements: You can make the sock’s “head” sound more appealing by putting a small bell or crinkly paper inside it.
- Slip It On: It will come to life when you put your hand inside the sock doll and move your fingers around.
- Engage in Playtime: Whirl the doll around, hide it behind furniture, or make it “speak” to get your cat’s attention and make it fun!
Final Touch:
By switching out the sock dolls’ colors and textures, you can keep your cat interested. When not in use, put the doll somewhere safe for cats to get to it, and have hours of fun playing with your cat!
13. DIY Interactive Bottle Puzzle for Cats

You can turn a regular plastic bottle into an interesting Interactive Bottle Puzzle that your cat will enjoy while you give them treats. Your cat will enjoy this easy but fun DIY project because it will require them to solve problems and play as they bat and roll the bottle to get to the treats inside. For fast eaters, it’s a fun way to slow down while also challenging their minds and getting them moving.
Materials Needed:
- An empty plastic bottle (small to medium size)
- Scissors or a utility knife
- Dry cat treats or kibble
- Sandpaper (optional, to smooth edges)
- Marker (to outline cutting areas)
Instructions:
- Prepare the Bottle: Take off any markings and clean and dry the plastic bottle.
- Mark and Cut the Holes: Make small holes around the bottle with a crayon. The holes should be big enough for the treats to fall out but not too big that it will be easy to open.
- Smooth the Edges: For safety, use sandpaper to smooth out any rough edges if you need to.
- Add the Treats: Put dry food or treats in the bottle.
- Seal and Test: Put the lid on tightly and roll the bottle around to see if the treats come out right. If you need to, change the sizes of the holes.
- Introduce It to Your Cat: Spread the bottle out on the floor and tell your cat to hit it. As they play, the treats will come out.
Final Touch:
By changing the form or size of the treats or bottles, you can keep your cat interested over time. Keep the puzzle out of reach when not in use to keep it interesting and give your cat endless fun and excitement.
14. DIY Yarn Ball Bonanza for Cats
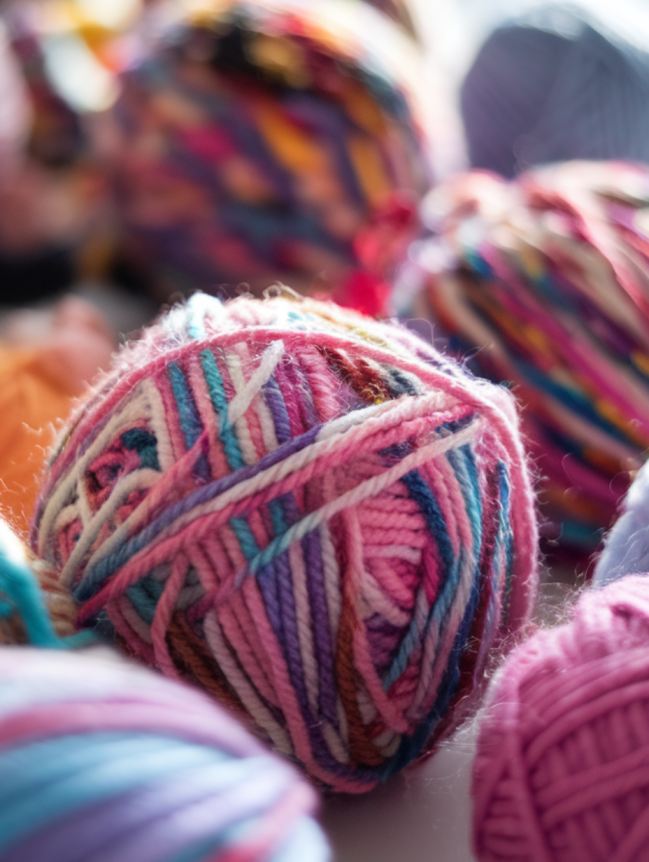

Your cat will love the fun dance of unraveling threads as you turn simple yarn into a tempting Yarn Ball Bonanza. To move like small prey, these soft, colored yarn balls can be batted, chased, and jumped on. They’re a great DIY toy for hours of fun because they’re fluffy and move in fun ways.
Materials Needed:
- Soft, pet-safe yarn (various colors)
- Scissors
- Small jingle bell or crinkly paper (optional, for added excitement)
- Catnip (optional, for extra allure)
Instructions:
- Create the Core: Make a small, soft ball by wrapping the yarn around your two fingers several times.
- Secure the Ball: Pull the yarn tight by tucking the end inside the loops. A small knot or a dot of non-toxic glue will make it last longer.
- Add Extra Fun (Optional): One way to make the yarn more interesting is to put a small jingle bell or a pinch of catnip in the middle before you tie it off.
- Introduce It to Your Cat: Any way you throw or roll the yarn ball, your cat will love to chase, jump on, and unravel the strands.
- Supervise Play: Change the yarn to fabric if your cat starts to chew on or swallow it.
Final Touch:
You can keep playtime interesting by switching up the yarn balls’ colors and textures. Your cat will stay excited about their homemade toy as long as you keep the yarn balls away when they’re not being used.
15. DIY Homemade Catnip Spray for Cats


With Homemade Catnip Spray, you can turn normal playtime into an exciting, smelly journey! This natural, easy-to-make spray adds the sweet smell of catnip to your cat’s favorite toys, scratching posts, and play places. This do-it-yourself spray is great for giving your cat a fun, stimulating experience while encouraging good habits like scratching certain areas and playing with toys.
Materials Needed:
- 2 tablespoons dried catnip (or fresh catnip leaves)
- 1 cup water
- Small pot (for boiling)
- Fine mesh strainer or coffee filter
- Spray bottle (clean and empty)
Instructions:
- Boil the Water: Boil one cup of water in a small pot.
- Add the Catnip: Put in 2 tablespoons of fresh or dried catnip and stir it in. Let it sit for 10 to 15 minutes.
- Strain the Mixture: To get rid of the solid catnip bits, use a fine mesh strainer or coffee filter. This will leave only the infused liquid.
- Cool and Transfer: Pour the liquid into a clean spray bottle after letting it cool down all the way.
- Use and Enjoy: Mist your cat’s favorite places to play and scratch, like beds, toys, scratching posts, or play areas. This will encourage them to play and rest.
Final Touch:
For even spread, shake the bottle before each use. For the freshest taste, keep in the fridge for up to a week. Use a small amount to keep your cat interested in the smell, which will make every fun session a pleasant one.
16. DIY Cardboard Castle Construction for Cats

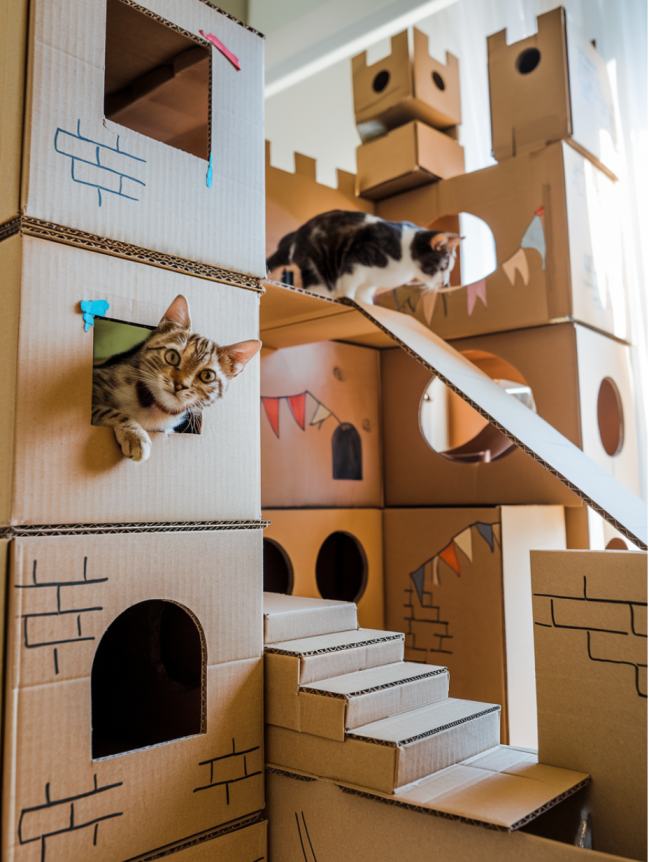
Make a cardboard castle construction, a fanciful stronghold that is ideal for your cat’s comfort and curiosity! Simple cardboard boxes are turned into a multi-level kingdom with tunnels, towers, and comfortable hiding places in this do-it-yourself project. In addition to providing your cat with an enjoyable and secure area to climb, hide, and relax like feline royalty, it’s the ideal approach to pique their curiosity.
Materials Needed:
- Multiple cardboard boxes (various sizes)
- Scissors or a utility knife
- Non-toxic glue or tape
- A marker (for planning window and door placements)
- Soft blankets or towels (for added comfort)
- Decorative elements (optional: fabric, stickers, paint, or string lights for flair)
Instructions:
- Plan the Castle Layout: To make several floors, tunnels, and hiding places, arrange boxes at various heights and locations.
- Cut Windows & Doors: Carefully cut out the peepholes, windows, and doors that you have marked with a marker.
- Secure the Structure: Using non-toxic glue or tape, join boxes to create stability for safe climbing.
- Add Comfort & Decoration: Line the interior with cozy blankets or towels, and if you’d like, add artistic decorations to the outside.
- Introduce Your Cat to Their Kingdom: Treats or toys can be used to encourage your cat to explore at their own speed.
Final Touch:
To keep your cat interested in the castle, periodically rearrange the boxes or add new entrances. This makeshift stronghold offers a comfortable haven and an exciting playground in one, providing hours of fun!
17. DIY Tennis Ball Treat Dispenser for Cats
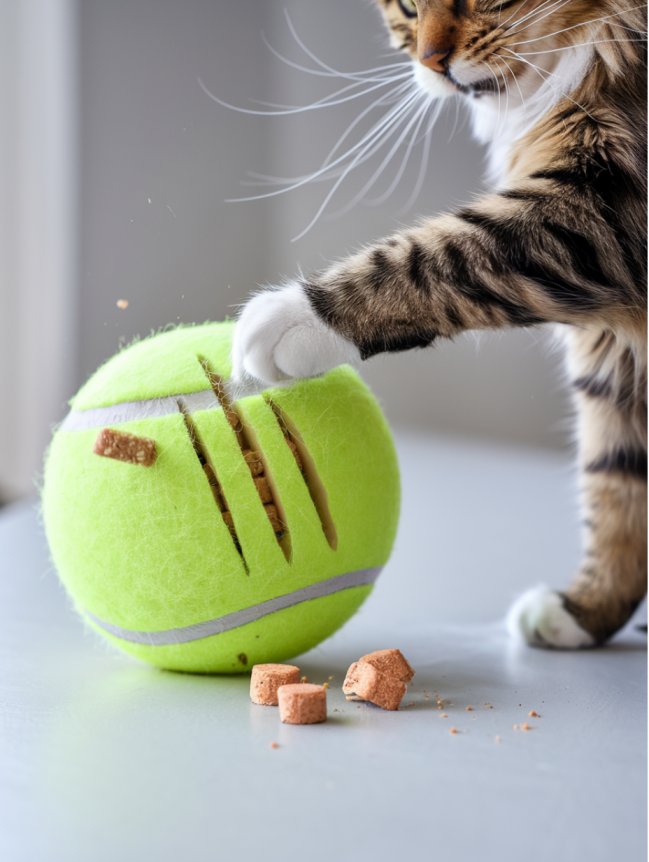
You can turn a simple tennis ball into a fun Tennis Ball Treat Dispenser that gives your cat treats and keeps them busy. This DIY interactive toy gets your cat moving, helps them solve problems, and keeps them entertained as they bat and roll the ball to release tasty treats. If your cat is active and likes both playing and eating, this treat feeder will make every swat fun.
Materials Needed:
- A clean, unused tennis ball
- A sharp utility knife or scissors
- Dry cat treats or kibble
- A marker (for marking the cut location)
Instructions:
- Prepare the Tennis Ball: Make sure your cat can play with the tennis ball without getting hurt.
- Cut a Slit: With care, cut a small slit (about 1 to 1.5 inches) in the ball with a utility knife or shears. Make sure it’s big enough for the treats to fall out but not so big that they spill out.
- Smooth the Edges: If you need to, you can trim or press the cut edges a little to make them softer and safer for your cat.
- Fill with Treats: Put dry cat food or small treats inside the ball. Gently shake it to see how they come out.
- Introduce the Toy: For a fun and satisfying game, put the ball on the floor and tell your cat to hit it. As it does, watch the treats fall out.
Final Touch:
Change the tastes of the treats you give your cat to keep them interested. Keep your cat interested and entertained every time you bring out the feeder by putting it away when you’re not using it.
18. DIY Herb-Infused Pom-Poms for Cats


Herb-Infused Pom-Poms are a fun do-it-yourself toy that blends soft textures, bright colors, and the alluring scent of cat-friendly herbs to appeal to your cat’s senses. These fluffy, lightweight pom-poms offer a natural sensory experience while promoting playful batting, pouncing, and cuddling. These pom-poms are a multi-sensory, tempting toy for feline enrichment that can be strung together to form a garland or left loose for individual play.
Materials Needed:
- Soft yarn (various colors)
- Dried catnip, silvervine, or valerian root (for herbal infusion)
- Scissors
- Cotton string or twine (for garland option)
- Non-toxic glue (optional, for securing loose ends)
- A small comb (to fluff the pom-poms)
Instructions:
- Create the Pom-Poms: To get the thickness you want, wrap yarn around your fingers or a small piece of cardboard.
- Tie and Trim: After removing the yarn, use string to tie a tight knot in the middle. Trim and cut the loops to make a fluffy, circular pom-pom.
- Infuse with Herbs: To improve absorption, carefully massage dry catnip, silvervine, or valerian root into the pom-pom fibers.
- String Together (Optional): To make a fun, interactive garland, thread the pom-poms onto a cotton string.
- Introduce to Your Cat: Watch your cat swat, smell, and pursue their new, fragrant toy after you place the herb-infused pom-poms in their play area!
Final Touch:
When not in use, store pom-poms in an airtight bag with extra dried herbs to revive the herbal aroma. To keep things interesting and provide hours of feline amusement and sensory stimulation, rotate them!
19. DIY Dangling Doorway Delights for Cats


Any opening can be turned into a fun, interactive Dangling opening Delights playground for your cat. This easy-to-make hanging toy set will keep your cat entertained for hours, and the hitting, batting, and jumping will stimulate their natural hunting instincts. Having a variety of hanging toys suspended from a safe tension rod will keep your cat mentally and physically active while saving space in your home.
Materials Needed:
- A sturdy tension rod (adjustable to fit your doorway)
- Assorted cat toys (plush, feathered, crinkly, or catnip-filled)
- String or elastic cords (for suspending the toys)
- Scissors
- Hooks or small clips (optional, for adjustable toy placement)
Instructions:
- Set Up the Tension Rod: Slide the rod into an opening so that it fits snugly and is at a safe height for your cat to reach.
- Attach the Toys: Put different cat toys on lines of different lengths and tie or clip them to the rod. To keep your cat interested, mix forms and textures.
- Ensure Safety: Make sure the toys are properly attached and that the strings are not too long so that they don’t get tangled.
- Introduce Playtime: Let your cat check out the new space. To get them interested, gently shake the toys.
- Adjust and Rotate: To keep the experience new and fun, move the toys around or swap them out every so often.
Final Touch:
Keep an eye on playtime to make sure everyone is safe, and if you need to, put the setup away when it’s not in use. This fun, space-saving activity zone gives your cat a stimulating place to be, encourages exercise, and offers interactive fun!
20. DIY Homemade Cat Grass Garden

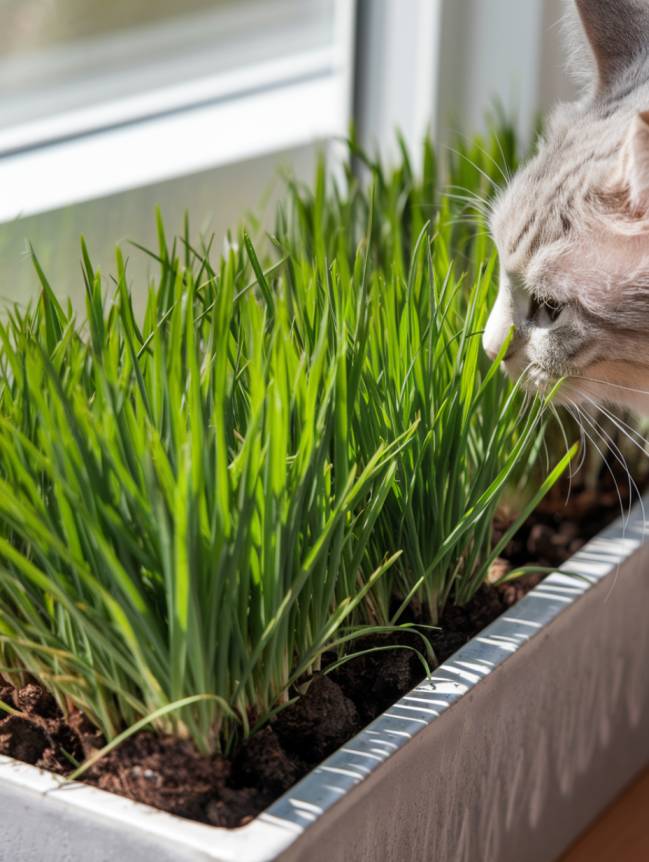
This Homemade Cat Grass Garden will bring a bit of nature inside. It’s also a healthy treat for your cat. This indoor garden is easy to take care of and gives your cat fresh, nutrient-dense grass that helps with digestion, stops hairballs, and feeds their natural urge to nibble on plants. The bright, soft grass makes for a fun sensory experience and brings a fresh air into your house.
Materials Needed:
- A shallow container or planter
- Organic cat grass seeds (such as wheatgrass, oat grass, barley, or rye)
- Potting soil (pet-safe, chemical-free)
- Spray bottle (for watering)
- A sunny windowsill or a well-lit area
Instructions:
- Prepare the Container: To keep water from building up, choose a shallow planter with holes in the bottom for drainage or line it with rocks.
- Add Soil: Put about one to two inches of organic potting soil in the pot.
- Plant the Seeds: Spread out the cat grass seeds on the ground and lightly press them down.
- Water Gently: Mist the dirt with a spray bottle until it’s just barely wet.
- Provide Light & Warmth: Put the pot somewhere sunny, like on a windowsill, where it will get indirect sunshine.
- Watch It Grow: The grass will grow in five to seven days. Mist the earth every day to keep it just slightly wet.
- Introduce to Your Cat: You can put the grass in your cat’s play area when it’s about 4 to 6 inches high. Let them eat away!
Final Touch:
Change out the pots so that there is always fresh cat grass on hand. If you cut the grass every so often to encourage new growth, your cat will always have their own little indoor yard.
21. DIY Repurposed T-Shirt Tug Toys for Cats


Repurposed T-Shirt Tug Toys are a fun and eco-friendly way to bring new life to old t-shirts. They are perfect for interactive play with your cat. You and your cat can play fetch, bat, and jump with these soft, colorful braided tug toys. They’re great for getting your cat active and spending time together. Since they are made from recycled cloth, they are safer and last longer than store-bought toys and are also good for the environment.
Materials Needed:
- Old t-shirts (various colors for a vibrant look)
- Scissors
- Measuring tape (optional, for even strips)
- Knotting or braiding skills
Instructions:
- Prepare the Fabric: Old t-shirts should be cut into long strips that are 12 to 18 inches long and about 1 to 2 inches wide.
- Braid the Strips: Knot three or more strips together tightly at one end. To make a long-lasting tug toy, braid the rope tightly.
- Secure the End: When the braid is the length you want, tie another knot at the other end to keep it from coming apart.
- Customize the Toy: For more fun, tie extra pieces of fabric along the braid or leave some ends free for a tassel look.
- Engage in Playtime: Your cat can play with the toy by waving it in front of it, dragging it across the floor, or dangling it so it can jump on it and tug on it.
Final Touch:
Keep several knotted tugs in different places around the house to keep your cat busy all day. By switching between colors and textures, you can give your cat hours of fun, long-lasting play.
22. DIY Bubble Wrap Bonanza for Cats
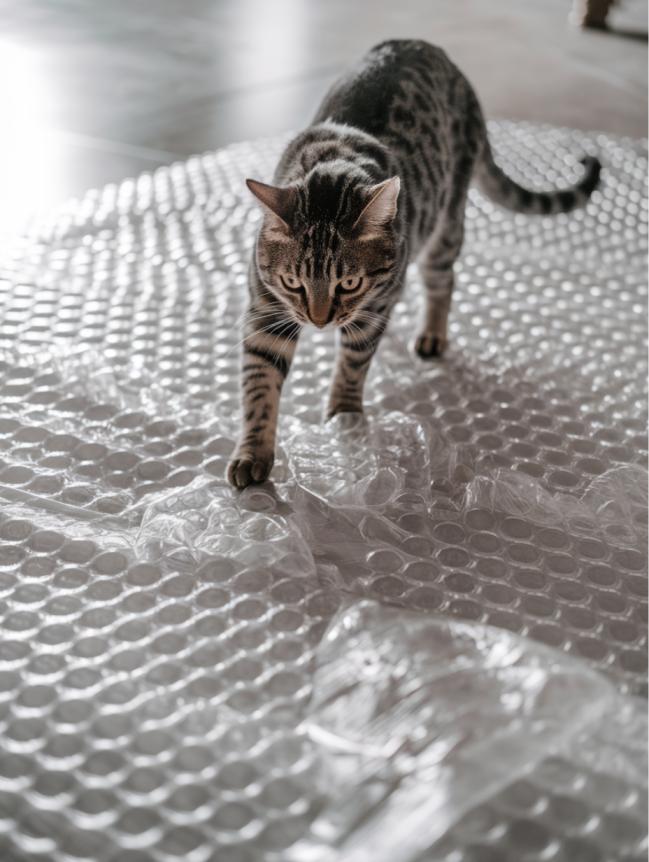
Make regular packing peanuts into a Bubble Wrap Bonanza for your cat. It will have fun and stimulate their senses. The different texture and pleasant pops will keep your cat interested and will benefit its mind and body. This easy DIY game makes playtime fun and joyful, whether the dogs are pouncing, pawing, or rolling across the wrap.
Materials Needed:
- A sheet of bubble wrap (clean and free from sharp edges)
- A flat, well-lit surface (such as a hardwood or tile floor)
- Small cat toys (optional, to encourage interaction)
- Tape (optional, to secure the wrap in place)
Instructions:
- Prepare the Play Area: Make sure there are no wrinkles in the bubble wrap and that it’s big enough for your cat to explore.
- Secure the Wrap (Optional): You can lightly tape the edges if you need to so the wrap doesn’t move around while you play.
- Introduce Your Cat: Put food or a cat’s favorite toy on top of the bubble wrap to get it to step on it.
- Observe & Play: As your cat explores the crinkly, springy surface, enjoy the new sounds and feelings.
- Rotate & Refresh: As needed, put the wrap back on after the bubbles pop to keep the fun going.
Final Touch:
Watch your cat while it plays to make sure it doesn’t chew on the wrap. For extra fun, put down different textures (like a blanket or rug on one side) to make the game more interesting and keep it fresh!
23. DIY Clothespin Critters for Cats


Enhance your cat’s playing with Clothespin Critters, a simple but fun do-it-yourself toy that turns regular clothespins into dangling, playable toys! Attaching feathers, small toys, or crinkly materials to clothespins and sticking them to surfaces makes a playroom that is always changing and encourages kids to hit, jump, and swat. Cats will enjoy this vertical play set, which also stimulates their natural hunting skills.
Materials Needed:
- Wooden or plastic clothespins
- Small toy mice, feathers, or fabric strips
- String or twine (for extra dangling effect)
- A sturdy surface (cardboard box edge, table, or cat tree)
- Non-toxic glue (optional, for secure attachments)
Instructions:
- Attach the Toys: Attach small toy mice, feathers, or fabric bits to the clothespins with glue or string.
- Clip to a Surface: Put the clothespins along the edges of a table, a strong cardboard box, or a scratching post.
- Adjust the Height: Simply move the clothespins around to make different levels of play that are more challenging and fun.
- Encourage Play: To get your cat to come closer and swipe, lightly tap or hang the toys.
- Rotate the Toys: Make sure your cat stays interested by changing the clips on toys every so often.
Final Touch:
Supervise playtime to make sure everyone is safe, and keep the clothespin animals away when they’re not being used to keep them fun. This simple toy set-up makes everyday household things into a fascinating cat playground and offers endless interactive fun.
24. DIY Miniature Blanket Fort for Cats


A Miniature Blanket Fort is an easy-to-make hideaway that will be the best place for your cat to relax and feel safe. It will also give them a sense of excitement. This simple but charming set-up gives your cat a cozy place to relax and play with you, whether it likes to curl up in a quiet spot or run in and out of hidden spaces.
Materials Needed:
- Small blankets, towels, or soft fabric
- Lightweight chairs, a cardboard box, or a cat bed (to serve as the fort frame)
- Clothespins or clips (optional, to secure blankets in place)
- A soft cushion or cat bed (for extra comfort inside the fort)
- Fairy lights (optional, for a cozy aesthetic)
Instructions:
- Choose a Location: Choose a place in your home that is quiet and comfortable for your cat to relax.
- Construct the Frame: Build the fort’s base out of furniture, a cardboard box, or a small cat bed.
- Drape the Blankets: Cover the frame with soft blankets to make a building that looks like a tent and has a small doorway. If you need to, use clothespins or clips to hold the fabric in place.
- Add Comfort Inside: Add a soft pillow, towel, or blanket inside the fort to make it feel even cozier.
- Introduce Your Cat: Put your cat’s favorite toy or treat inside the fort to get them to explore it.
- Enhance the Experience: Add soft fairy lights around the fort to make it look more magical. Make sure the kids are safe by keeping the wires out of reach.
Final Touch:
Move the blanket fort around every so often to keep your cat interested, and change how it’s set up to suit their comfort and interest. This cozy hideaway is the right mix of safety, comfort, and fun, so your cat will love it!
25. DIY Whack-a-Mouse Cat Game


A Whack-a-Mouse Cat Game is a fun and easy-to-make toy that will give your cat the thrill of a classic arcade game. It will also stimulate your cat’s natural hunting skills. Your cat will learn to bat, paw, and solve problems as it tries to “catch” moving toys through holes in a box when it plays this way.
Materials Needed:
- A sturdy cardboard box (shoebox or larger)
- Scissors or a utility knife
- Small toy mice, fabric strips, or feathered toys
- A wooden dowel, chopstick, or string (for controlling the toys)
- Non-toxic glue or tape (optional, for reinforcement)
Instructions:
- Prepare the Box: Get a wooden box and make sure it has enough room to play on. Seal off any gaps that aren’t closed with tape.
- Cut Holes: Cut several small holes (about the size of a cat’s paw) on the top and sides of the box, making sure to leave some space between them for variety.
- Attach the Toys: Stick a wooden dowel, chopstick, or string through small toy mice, fabric strips, or feathers. These will be the “mice” that come out of the holes.
- Interactive Play: To keep your cat interested in a fun game of whack-a-mouse, put the toy through different holes and move it around randomly.
- Encourage Hunting Behavior: Change how the toy moves—make it disappear and return to make it look like real prey. This will keep the experience interesting and stimulating.
Final Touch:
To keep your cat interested, switch up the toy clips every so often. For your cat to play on its own, put smaller, loose things inside the box for it to paw at and get. This do-it-yourself cat game is good for their mind and body and will keep them busy for hours.
26. DIY Floating Ping Pong Ball Chase
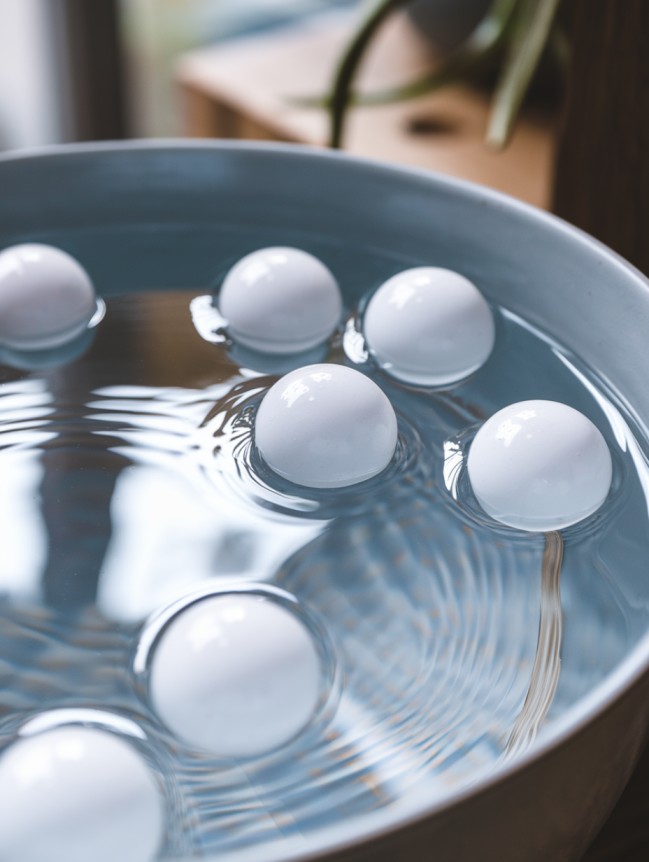

With a Floating Ping Pong Ball Chase, a straightforward yet captivating do-it-yourself toy that transforms water play into an enjoyable and exciting activity, you may appeal to your cat’s natural curiosity and hunting instincts! This game offers your cat amusement and cerebral stimulation by encouraging them to paw, splash, and pursue lightweight balls that float randomly.
Materials Needed:
- A shallow plastic or ceramic bowl (wide enough for play)
- Clean water
- Ping pong balls (or other lightweight floating toys)
- Optional: Catnip-infused water (for added attraction)
Instructions:
- Prepare the Bowl: Pour a couple of inches of clean water into a shallow, sturdy basin. To keep it from toppling over, make sure it is stable.
- Add Floating Balls: Add one or more ping pong balls and let them float and move randomly across the water’s surface.
- Introduce Your Cat: Let your cat explore the dish after placing it in a peaceful spot. While some might get enthralled with the movement, others would paw at the balls gently.
- Encourage Play: If necessary, add water flavored with catnip for added interest or gently tap a ball to produce movement.
- Monitor & Adjust: To keep your cat interested, make sure the water level stays safe and clean and change the arrangement from time to time.
Final Touch:
Try experimenting with different bowl sizes and utilizing different floating items, such as rubber duckies or bottle caps, for variation. Curious cats may engage in interactive play while staying hydrated with this entertaining and secure water game!
Conclusion:
Building homemade cat toys from household items is a fun, eco-friendly, and long-lasting way to keep your cat busy. It doesn’t take much work to turn daily items like bubble wrap, socks, cardboard boxes, and even t-shirts into fun toys that will keep you entertained for hours. Not only do these do-it-yourself projects save you money, but they also help you and your cat bond by letting you play together.
You can please your cat’s natural urges by making homemade games with different sounds, textures, and movements. This is true whether they like to chase, pounce, or cuddle with their toys. Reusing household items also cuts down on waste, so these toys are good for the world and fun for your pet. Feel free to try out different ideas, change the toys around often to keep things interesting, and enjoy the happiness of making unique toys that your furry friend will love!